

プロジェクト「Sprite1」の作成
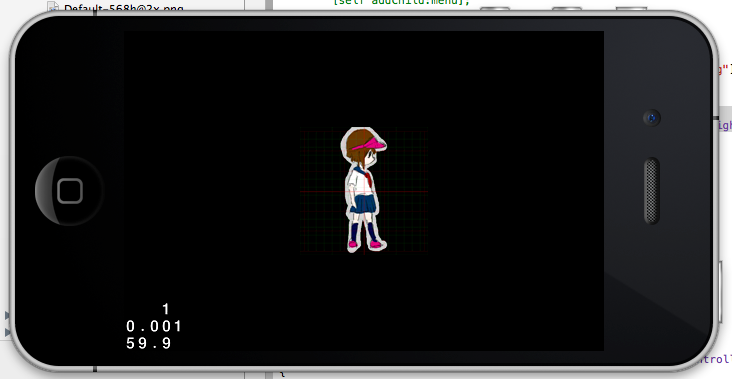
今回は、スプライトを設置してみます。スプライトとはUIKitで言うところの、UIViewのようなものです。最終的には以下の様な画面が出るようにします。
前回でプロジェクトが作れるようになったので、まずはプロジェクトを作ってみましょう。
今回はプロジェクト名は「Sprite1」という名前にしました。
「cocos2d iOS」を選択します。

「Sprite1」という名前をつけてNext。

以上でSprite1のプロジェクトが出来上がりました。
それでは早速ビルドしてみましょう。
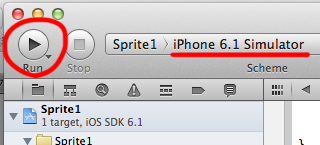
このボタンを押すとシュミレーターが起動します。
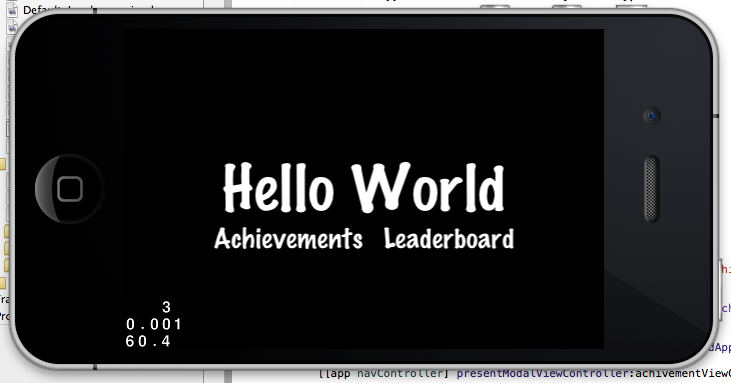
cocos2dの画面が出た後、「Hello World」と出て来ます。
スプライトを置いてみる
それでは、この「Hello World」と書いてある部分に、画像を表示させてみましょう。
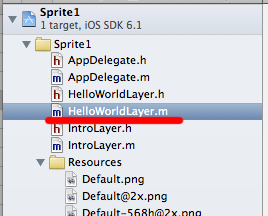
「HelloWorldLayer.m」を選択します。
続いて、ファイルの中の以下の記述の部分について
[objc]
// on "init" you need to initialize your instance
-(id) init
{
// always call "super" init
// Apple recommends to re-assign "self" with the "super’s" return value
if( (self=[super init]) ) {
// create and initialize a Label
CCLabelTTF *label = [CCLabelTTF labelWithString:@"Hello World" fontName:@"Marker Felt" fontSize:64];
// ask director for the window size
CGSize size = [[CCDirector sharedDirector] winSize];
// position the label on the center of the screen
label.position = ccp( size.width /2 , size.height/2 );
// add the label as a child to this Layer
[self addChild: label];
//
// Leaderboards and Achievements
//
// Default font size will be 28 points.
[CCMenuItemFont setFontSize:28];
// to avoid a retain-cycle with the menuitem and blocks
__block id copy_self = self;
// Achievement Menu Item using blocks
CCMenuItem *itemAchievement = [CCMenuItemFont itemWithString:@"Achievements" block:^(id sender) {
GKAchievementViewController *achivementViewController = [[GKAchievementViewController alloc] init];
achivementViewController.achievementDelegate = copy_self;
AppController *app = (AppController*) [[UIApplication sharedApplication] delegate];
[[app navController] presentModalViewController:achivementViewController animated:YES];
[achivementViewController release];
}];
// Leaderboard Menu Item using blocks
CCMenuItem *itemLeaderboard = [CCMenuItemFont itemWithString:@"Leaderboard" block:^(id sender) {
GKLeaderboardViewController *leaderboardViewController = [[GKLeaderboardViewController alloc] init];
leaderboardViewController.leaderboardDelegate = copy_self;
AppController *app = (AppController*) [[UIApplication sharedApplication] delegate];
[[app navController] presentModalViewController:leaderboardViewController animated:YES];
[leaderboardViewController release];
}];
CCMenu *menu = [CCMenu menuWithItems:itemAchievement, itemLeaderboard, nil];
[menu alignItemsHorizontallyWithPadding:20];
[menu setPosition:ccp( size.width/2, size.height/2 – 50)];
// Add the menu to the layer
[self addChild:menu];
}
return self;
}
[/objc]
次のように修正します。
[objc]
// on "init" you need to initialize your instance
-(id) init
{
// always call "super" init
// Apple recommends to re-assign "self" with the "super’s" return value
if( (self=[super init]) ) {
// Spriteを生成
CCSprite * sprite1 = [CCSprite spriteWithFile:@"sample1.png"];
// Spriteを追加
[self addChild:sprite1];
}
return self;
}
[/objc]
if( (self=[super init]) ){ [中略] }
の[中略]の部分をおもいっきり削除して、コードを入れています。
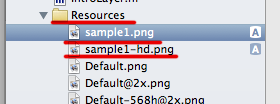
続いて、画像を追加します。
こちらの画像、sample1.pngとsample1-hd.pngを
Resourcesに追加します。
それではビルドしてみましょう!
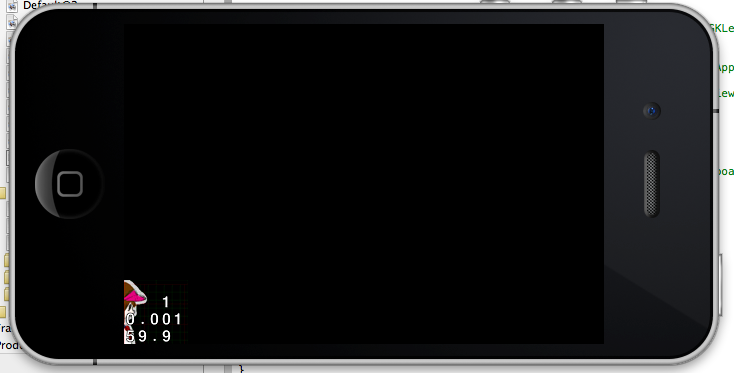
見切れていますが、画像が追加できました!
位置を調整しよう
画像が見切れているのは、配置する座標を指定していないからです。
座標を指定するコードは以下のとおり。
[objc]
// スプライトを画像の中心に配置する
CGSize windowSize = [[CCDirector sharedDirector] windowSize];
sprite1.position = CGPointMake(windowSize.width/2, windowSize.height /2);
[/objc]
これをさきほどのコードの中に挿入します。
[objc]
// on "init" you need to initialize your instance
-(id) init
{
// always call "super" init
// Apple recommends to re-assign "self" with the "super’s" return value
if( (self=[super init]) ) {
// Spriteを生成
CCSprite * sprite1 = [CCSprite spriteWithFile:@"sample1.png"];
// スプライトを画像の中心に配置する
CGSize winSize = [[CCDirector sharedDirector] winSize];
sprite1.position = CGPointMake(winSize.width/2, winSize.height /2);
// Spriteを追加
[self addChild:sprite1];
}
return self;
}
[/objc]
これで画像が画面中央に表示できました。