なんでかなーと思ったら、アパッチを再起動し忘れてた。
[bash]
$ apachectl restart
[/bash]
なにかと忘れがちなのでメモ。
eggmobile
なんでかなーと思ったら、アパッチを再起動し忘れてた。
[bash]
$ apachectl restart
[/bash]
なにかと忘れがちなのでメモ。
iOSと全く関係ない、コードイグナイターのフォームヘルパーの使い方。
controllerのコンストラクタに
[php]
$this->load->helper(‘form’);
[/php]
と書いておいて、viewなどに以下のように書くと
[html]
<!–?php form_open(‘hoge/fuga’); ?–>
<!–?php echo form_password(‘password’); ?–>
<!–?php echo form_submit(‘submit’, ‘送信’); ?–>
[/html]
HTMLではこうなる
[html]</pre>
<form accept-charset="utf-8" action="http://yourdomain.com/hoge/fuga/" method="post"><input type="password" name="password/send" value="" />
<input type="submit" name="submit" value="送信" /></form>
<pre>[/html]
フォームを作ってくれて便利。
受け取り側のコントローラーではこんなふうに書いて値を取る
[php]
$data[‘password’] = $this->input->post(‘password’);
[/php]
iOSアプリが起動しているのか、バックグラウンドなのかを見る方法。
UIApplicationStateというクラスを使います。
[objc]
// アプリケーションの状態を見る。
UIApplicationState applicationState = [[UIApplication sharedApplication] applicationState];
NSString *state = @"Unknown";
if (applicationState == UIApplicationStateActive) {
// アクティブなとき
state = @"Active";
}else if(applicationState == UIApplicationStateBackground){
// バックグラウンドのとき
state = @"Background";
}else if(applicationState == UIApplicationStateInactive){
// アクティブじゃないとき
state = @"Inactive";
}
NSLog(@"アプリケーションの状態 : %@", state);
[/objc]
iOS7ではバックグラウンドでできることの幅が広がったので、これで状態をいろいろ確認しながらテスト開発できます。
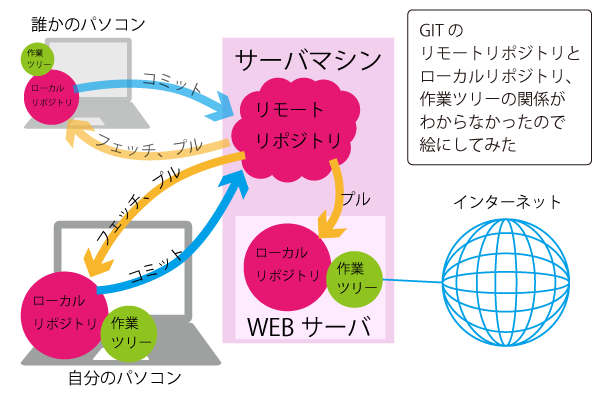
Gitを使ってみて、Gitのしくみがいまいちわからなくて混乱したので、今日わかったことを羅列します。
この3つです。
まずよくわかっていなかったのが、「リモートリポジトリ」というものの存在です。
リモートリポジトリというのは「遠隔にあるリポジトリ」だと思っていて、ローカルリポジトリの一種だと思っていました。
しかしその理解はまちがいでした。
リモートリポジトリとは、みんながコミットする集積所みたいなものなのですね。
リモートリポジトリとローカルリポジトリがこんがらがっていたので、サーバ上のどれをWebに公開すればいいのかと、ずーと悩んでいました。
リモートリポジトリの作業ツリーを公開するのではなくて、サーバマシン内にGit Cloneして、そこの作業ツリーをWebに公開すればよかったのですね。
まず、クローンを設置する場所(/var/www/test/)に移動して、
[bash]
$ cd /var/www/test/
[/bash]
リモートリポジトリ(/var/git_repos/TEST_WEB.git)からクローンを作成する
[bash]
$ git clone /var/git_repos/TEST_WEB.git
[/bash]
こちらのページが非常に参考になりました。
Git初心者に捧ぐ!Gitの「これなんで?」を解説します。
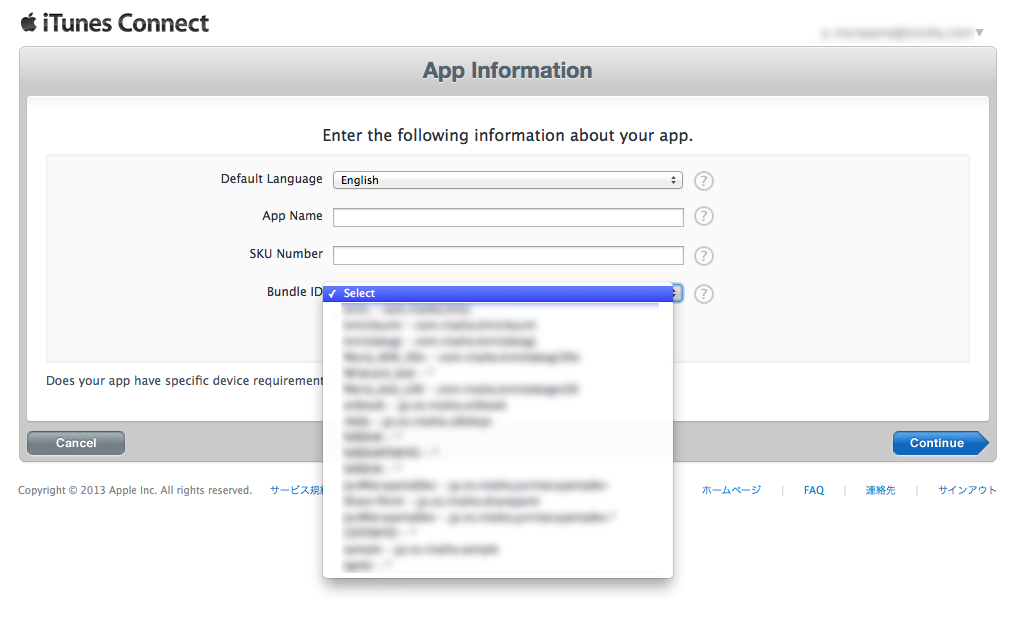
iTunes ConnectからのiPhoneアプリ申請で、新規アプリ作成をするときに新しく作成したApp IDが出てこない問題が発生しました。(2013年 11月13日)
先月も同様の問題が発生していたようです。(2013年 10月28日)
https://devforums.apple.com/message/912211#912211
そして前日にも同様の内容でフォーラムに投稿されていました。
https://devforums.apple.com/message/917778#917778
申請が出せないのは困るので(納期的に)、contact usから「問題があって新規にアプリ申請できませんよ!」って送ったのですが、「スクリーンショットとか添付してまた返信してください(じゃないと対応しないよ)」というつれない返事。
それで困り果ててしまったのですが、翌日再度見てみると、なんと追加されていました。意味がわかりません。(前日のスクリーンショットを再確認したのですが、前日は間違いなく追加されていなかったので、見落としではありませんでした。)
つまり、一日置いたらBundle IDがアプリ新規申請ページのドロップダウンメニューに追加されていたのです。他には何もしていません。
というわけで、Bundle IDが出てこない時の解決法としては「1日寝かせてみる」でしょうか。それでダメだったらアップルにメールしましょう。
iTunes ConnectやiOS dev centerはここ数ヶ月ぐらいずっと挙動がおかしい気がします。
安定するように改善して欲しいところです。。。
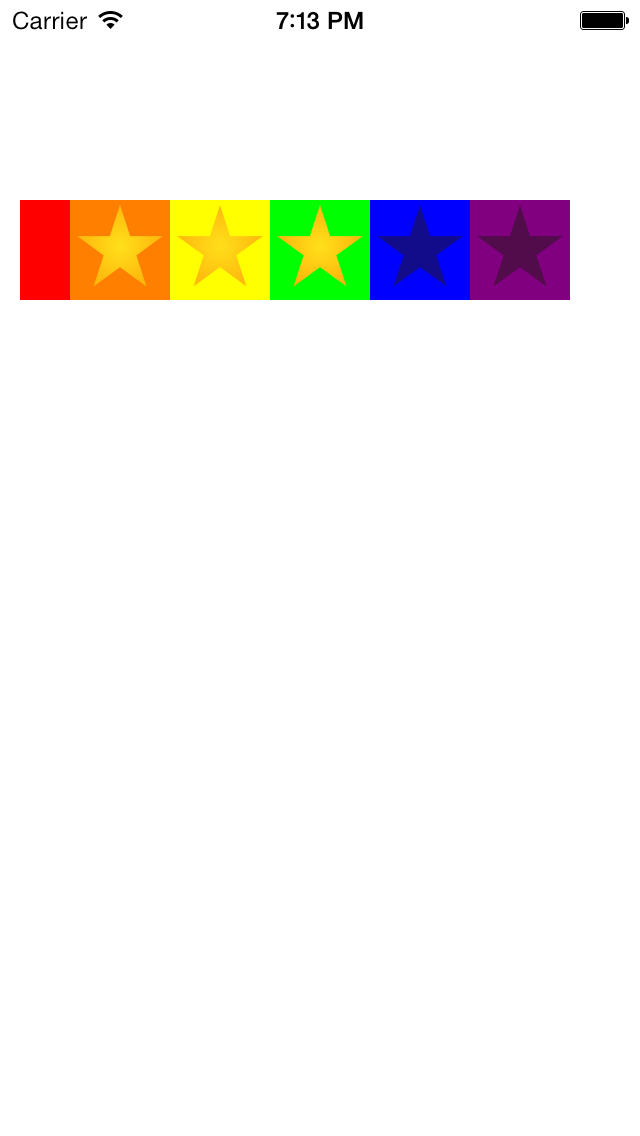
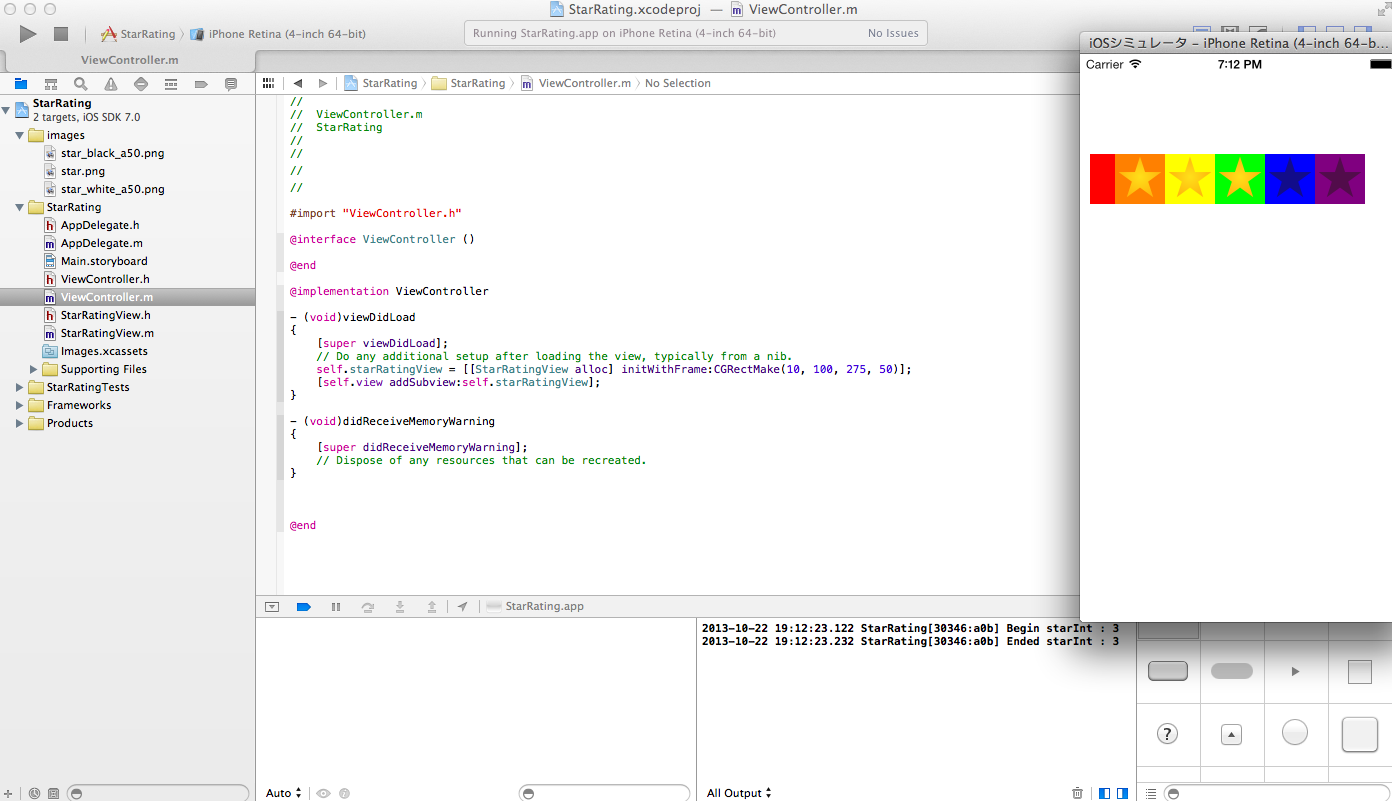
5つ並んだ星をタッチして、AppStoreのレビューのように0~5の値を入出力できるUI用のパーツです。わかりやすくするよう、星ひとつひとつの背景色に色をつけてあります。また、一番端の赤い領域に触れると、星を0として入力できます。
こちらがUIViewのサブクラスStarRatingViewの本体。
StarRatingView.h
[objc]
#import <UIKit/UIKit.h>
@interface StarRatingView : UIView{
UIView * zeroView;
UIImageView * firstStarView;
UIImageView * secondStarView;
UIImageView * thirdStarView;
UIImageView * fourthStarView;
UIImageView * fifthStarView;
}
@property(nonatomic) int starValue;
@property(strong, nonatomic) UIImage * starImage;
@property(strong, nonatomic) UIImage * darkStarImage;
@end
[/objc]
StarRatingView.m
[objc]
#import "StarRatingView.h"
#define STAR_WIDTH(width) width / 5.5
#define FIRST_STAR_X(width) width / 11
#define SECOND_STAR_X(width) (3 * width) /11
#define THIRD_STAR_X(width) (5 * width) /11
#define FOURTH_STAR_X(width) (7 * width) /11
#define FIFTH_STAR_X(width) (9 * width) /11
@implementation StarRatingView
– (id)initWithFrame:(CGRect)frame
{
self = [super initWithFrame:frame];
if (self) {
// Initialization code
// 初期値
self.starValue = 0;
// タッチができるようにする
self.userInteractionEnabled = YES;
// 星用のimageViewを作成
zeroView = [[UIView alloc] initWithFrame:CGRectMake(0, 0, STAR_WIDTH(self.frame.size.width), self.frame.size.height)];
firstStarView = [[UIImageView alloc] initWithFrame:CGRectMake(FIRST_STAR_X(self.frame.size.width), 0, STAR_WIDTH(self.frame.size.width), self.frame.size.height)];
secondStarView = [[UIImageView alloc] initWithFrame:CGRectMake(SECOND_STAR_X(self.frame.size.width), 0, STAR_WIDTH(self.frame.size.width), self.frame.size.height)];
thirdStarView = [[UIImageView alloc] initWithFrame:CGRectMake(THIRD_STAR_X(self.frame.size.width), 0, STAR_WIDTH(self.frame.size.width), self.frame.size.height)];
fourthStarView = [[UIImageView alloc] initWithFrame:CGRectMake(FOURTH_STAR_X(self.frame.size.width), 0, STAR_WIDTH(self.frame.size.width), self.frame.size.height)];
fifthStarView = [[UIImageView alloc] initWithFrame:CGRectMake(FIFTH_STAR_X(self.frame.size.width), 0, STAR_WIDTH(self.frame.size.width), self.frame.size.height)];
// 星を作成
self.starImage = [UIImage imageNamed:@"star.png"];
self.darkStarImage = [UIImage imageNamed:@"star_black_a50.png"];
// 画像を指定
firstStarView.image = self.darkStarImage;
secondStarView.image = self.darkStarImage;
thirdStarView.image = self.darkStarImage;
fourthStarView.image = self.darkStarImage;
fifthStarView.image = self.darkStarImage;
// viewに追加
[self addSubview:zeroView];
[self addSubview:firstStarView];
[self addSubview:secondStarView];
[self addSubview:thirdStarView];
[self addSubview:fourthStarView];
[self addSubview:fifthStarView];
// 背景色を変更
zeroView.backgroundColor = [UIColor redColor];
firstStarView.backgroundColor = [UIColor orangeColor];
secondStarView.backgroundColor = [UIColor yellowColor];
thirdStarView.backgroundColor = [UIColor greenColor];
fourthStarView.backgroundColor = [UIColor blueColor];
fifthStarView.backgroundColor = [UIColor purpleColor];
self.backgroundColor = [UIColor grayColor];
}
return self;
}
/*
// Only override drawRect: if you perform custom drawing.
// An empty implementation adversely affects performance during animation.
– (void)drawRect:(CGRect)rect
{
// Drawing code
}
*/
// タッチ開始
– (void)touchesBegan:(NSSet *)touches withEvent:(UIEvent *)event
{
UITouch *touch = [touches anyObject];
CGPoint location = [touch locationInView:self];
//NSLog(@"Began x:%f y:%f", location.x, location.y);
int starInt = [self calculateTouchLocation:location.x];
NSLog(@"Begin starInt : %d", starInt);
[self showStar:starInt];
self.starValue = starInt;
}
// タッチ移動
– (void)touchesMoved:(NSSet *)touches withEvent:(UIEvent *)event
{
UITouch *touch = [touches anyObject];
CGPoint location = [touch locationInView:self];
//NSLog(@"Moved x:%f y:%f", location.x, location.y);
int starInt = [self calculateTouchLocation:location.x];
//NSLog(@"Moved starInt : %d", starInt);
[self showStar:starInt];
self.starValue = starInt;
}
// タッチ終了
– (void)touchesEnded:(NSSet *)touches withEvent:(UIEvent *)event
{
UITouch *touch = [touches anyObject];
CGPoint location = [touch locationInView:self];
//NSLog(@"Ended x:%f y:%f", location.x, location.y);
int starInt = [self calculateTouchLocation:location.x];
NSLog(@"Ended starInt : %d", starInt);
[self showStar:starInt];
self.starValue = starInt;
}
// 座標を0~5の数値に変換
-(int)calculateTouchLocation:(double)locationX
{
int starInt = 0;
if (locationX < FIRST_STAR_X(self.frame.size.width)) {
starInt = 0;
}else if (locationX >= FIRST_STAR_X(self.frame.size.width) && locationX < SECOND_STAR_X(self.frame.size.width)){
starInt = 1;
}else if (locationX >= SECOND_STAR_X(self.frame.size.width) && locationX < THIRD_STAR_X(self.frame.size.width)){
starInt = 2;
}else if (locationX >= THIRD_STAR_X(self.frame.size.width) && locationX < FOURTH_STAR_X(self.frame.size.width)){
starInt = 3;
}else if (locationX >= FOURTH_STAR_X(self.frame.size.width) && locationX < FIFTH_STAR_X(self.frame.size.width)){
starInt = 4;
}else if (locationX >= FIFTH_STAR_X(self.frame.size.width)){
starInt = 5;
}else{
starInt = 0;
}
return starInt;
}
-(void)showStar:(int)value{
switch (value) {
case 0:
firstStarView.image = self.darkStarImage;
secondStarView.image = self.darkStarImage;
thirdStarView.image = self.darkStarImage;
fourthStarView.image = self.darkStarImage;
fifthStarView.image = self.darkStarImage;
break;
case 1:
firstStarView.image = self.starImage;
secondStarView.image = self.darkStarImage;
thirdStarView.image = self.darkStarImage;
fourthStarView.image = self.darkStarImage;
fifthStarView.image = self.darkStarImage;
break;
case 2:
firstStarView.image = self.starImage;
secondStarView.image = self.starImage;
thirdStarView.image = self.darkStarImage;
fourthStarView.image = self.darkStarImage;
fifthStarView.image = self.darkStarImage;
break;
case 3:
firstStarView.image = self.starImage;
secondStarView.image = self.starImage;
thirdStarView.image = self.starImage;
fourthStarView.image = self.darkStarImage;
fifthStarView.image = self.darkStarImage;
break;
case 4:
firstStarView.image = self.starImage;
secondStarView.image = self.starImage;
thirdStarView.image = self.starImage;
fourthStarView.image = self.starImage;
fifthStarView.image = self.darkStarImage;
break;
case 5:
firstStarView.image = self.starImage;
secondStarView.image = self.starImage;
thirdStarView.image = self.starImage;
fourthStarView.image = self.starImage;
fifthStarView.image = self.starImage;
break;
default:
firstStarView.image = self.darkStarImage;
secondStarView.image = self.darkStarImage;
thirdStarView.image = self.darkStarImage;
fourthStarView.image = self.darkStarImage;
fifthStarView.image = self.darkStarImage;
break;
}
}
@end
[/objc]
実装するときはStarRatingViewオブジェクトをaddSubViewすれば設置できます。
viewControllerなどにこんなかんじで設置します。
[objc]
StarRatingView *starRatingView = [[StarRatingView alloc] initWithFrame:CGRectMake(10, 100, 275, 50)];
[self.view addSubview:self.starRatingView];
[/objc]
値を出し入れするときは、「starRatingView.starValue」からアクセスします。
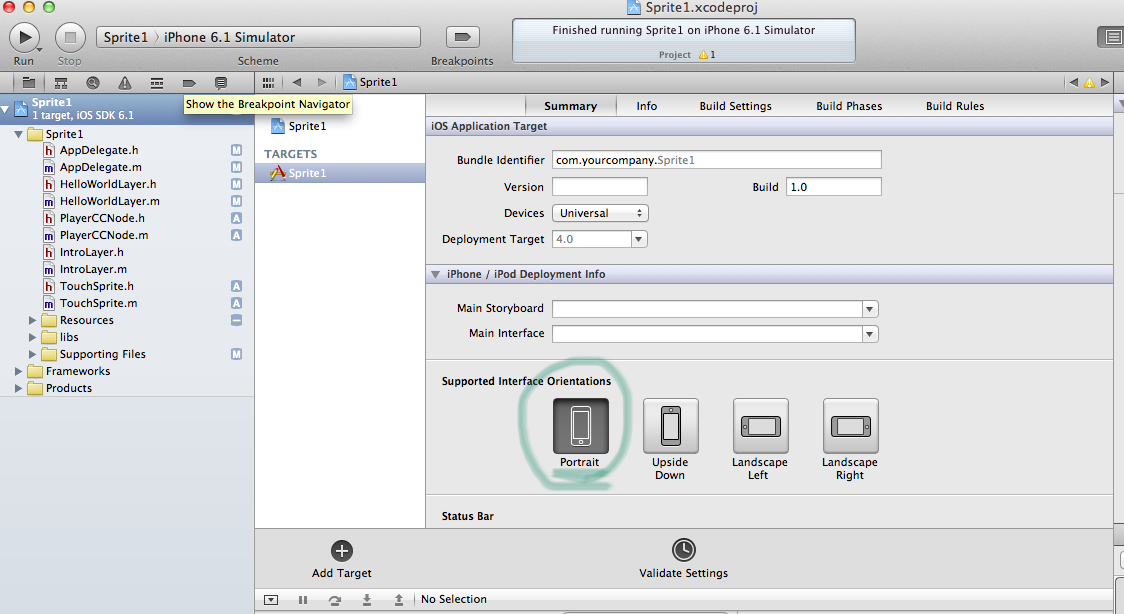
cocos2dの新規プロジェクトで作ったアプリの画面は横画面(Landscape)ですが、これを縦画面(Portrait)に変更します。バージョンは2.1です。
まずiPhone / iPod Deployment Infoを変更します。
つぎにAppDelegate.mを変更します。
AppDelegate.m
[objc]
// The available orientations should be defined in the Info.plist file.
// And in iOS 6+ only, you can override it in the Root View controller in the "supportedInterfaceOrientations" method.
// Only valid for iOS 6+. NOT VALID for iOS 4 / 5.
-(NSUInteger)supportedInterfaceOrientations {
// iPhone only
if( [[UIDevice currentDevice] userInterfaceIdiom] == UIUserInterfaceIdiomPhone )
//return UIInterfaceOrientationMaskLandscape;
return UIInterfaceOrientationMaskPortrait; // 差し替え
// iPad only
//return UIInterfaceOrientationMaskLandscape;
return UIInterfaceOrientationMaskPortrait; // 差し替え
}
// Supported orientations. Customize it for your own needs
// Only valid on iOS 4 / 5. NOT VALID for iOS 6.
– (BOOL)shouldAutorotateToInterfaceOrientation:(UIInterfaceOrientation)interfaceOrientation
{
// iPhone only
if( [[UIDevice currentDevice] userInterfaceIdiom] == UIUserInterfaceIdiomPhone )
//return UIInterfaceOrientationIsLandscape(interfaceOrientation);
return UIInterfaceOrientationIsPortrait(interfaceOrientation); // 差し替え
// iPad only
// iPhone only
//return UIInterfaceOrientationIsLandscape(interfaceOrientation);
return UIInterfaceOrientationIsPortrait(interfaceOrientation); // 差し替え
}
[/objc]
以上で横画面化は完了です。
cocos2dで新しいクラスを作成して、別のクラスからメソッドを実行しようとしたらEXC_BAD_ACCESSがひたすら出て、困り果てました。
結論から言うと、作業していたcocos2dプロジェクトをARC対応にしていなかったのが原因でした。
Cocos2D 2.X プロジェクトをARCに対応させる方法
↑こちらのページの方法でプロジェクトをARC対応させたらうまくいきました。
備忘のため時系列メモ
前回まででキャラクターと背景を置くことができました。
今回は、前回置いたキャラクターをアニメのように動かしてみます。
アニメーションするコードを書きましょう
下記の「ここから追加(4.キャラクターを動かしてみよう)」から「ここまで追加(4.キャラクターを動かしてみよう)」を前回までのコードに追加します。
[objc]
// on "init" you need to initialize your instance
-(id) init
{
// always call "super" init
// Apple recommends to re-assign "self" with the "super’s" return value
if( (self=[super init]) ) {
// Spriteを生成
CCSprite * sprite1 = [CCSprite spriteWithFile:@"sample1.png"];
CCSprite * background = [CCSprite spriteWithFile:@"background.png"];
// スプライトを画像の中心に配置する
CGSize winSize = [[CCDirector sharedDirector] winSize];
sprite1.position = CGPointMake(winSize.width/2, winSize.height /2);
background.position = CGPointMake(winSize.width/2, winSize.height /2);
// Spriteを追加
[self addChild:sprite1 z:2];
[self addChild:background z:1];
// ここから追加(4.キャラクターを動かしてみよう)
//一枚の画像からパラパラ漫画のようなアニメを作る
//バッチノードの設定
CCSpriteBatchNode * batchRun= [CCSpriteBatchNode batchNodeWithFile:@"run.png"];
[self addChild:batchRun z:3];
//スプライトをつくり バッチノードに入れる
CCSprite *spriteRun= [CCSprite spriteWithFile:@"run.png"];
spriteRun.position = CGPointMake(winSize.width/2, winSize.height /2);;
[batchRun addChild:spriteRun];
//画像データを配列に登録
CCSpriteFrame* frame1 = [CCSpriteFrame frameWithTexture:batchRun.texture rect:CGRectMake(0,0,128,128)];
CCSpriteFrame* frame2 = [CCSpriteFrame frameWithTexture:batchRun.texture rect:CGRectMake(128,0,128,128)];
CCSpriteFrame* frame3 = [CCSpriteFrame frameWithTexture:batchRun.texture rect:CGRectMake(256,0,128,128)];
CCSpriteFrame* frame4 = [CCSpriteFrame frameWithTexture:batchRun.texture rect:CGRectMake(384,0,128,128)];
CCSpriteFrame* frame5 = [CCSpriteFrame frameWithTexture:batchRun.texture rect:CGRectMake(0,128,128,128)];
CCSpriteFrame* frame6 = [CCSpriteFrame frameWithTexture:batchRun.texture rect:CGRectMake(128,128,128,128)];
CCSpriteFrame* frame7 = [CCSpriteFrame frameWithTexture:batchRun.texture rect:CGRectMake(256,128,128,128)];
CCSpriteFrame* frame8 = [CCSpriteFrame frameWithTexture:batchRun.texture rect:CGRectMake(384,128,128,128)];
NSArray* frameArray = [NSArray arrayWithObjects: frame1, frame2,frame3,frame4,frame5,frame6,frame7,frame8, nil];
//アニメをつくる
CCAnimation *animation = [CCAnimation animationWithFrames:frameArray delay:0.1f];
id repeat = [CCRepeatForever actionWithAction:[CCAnimate actionWithAnimation:animation restoreOriginalFrame:NO]];
[spriteRun runAction:repeat];
// ここまで追加(4.キャラクターを動かしてみよう)
}
return self;
}
[/objc]
ちょっと長くなってしまいました。
イメージでお話するとこんなかんじです。
それではビルドしてみましょう。
女の子が走っているのが確認できたと思います。
次回は、この走りに合わせて背景も動かしてみます。
前回と同じ要領で、背景を置いてみましょう。
背景画像はこちら。
そういえば前回書き忘れましたが、画像素材をなぜサイズ違いで2種類用意するのか。
これは、iPhoneのRetinaモデルとそうでないものを両方共対応するためです。
-hdとつけると、Retina用の画像だと識別してくれます。便利ですね。
それでは本題。前回作ったコードをいじっていきます。
-(id)init を以下のように修正します。
[objc]
-(id) init
{
// Spriteを生成
CCSprite * sprite1 = [CCSprite spriteWithFile:@"sample1.png"];
CCSprite * background = [CCSprite spriteWithFile:@"background.png"]; // 背景用に追加したコード
// スプライトを画像の中心に配置する
CGSize winSize = [[CCDirector sharedDirector] winSize];
sprite1.position = CGPointMake(winSize.width/2, winSize.height /2);
background.position = CGPointMake(winSize.width/2, winSize.height /2); // 背景用に追加したコード
// Spriteを追加
[self addChild:sprite1];
[self addChild:background]; // 背景用に追加したコード
}
return self;
}
[/objc]
sprite1と同じようにbackgroundという新しいスプライトを同じ位置に置いただけです。
とりあえずこのままビルドしてみましょう。
壁に隠れたシャイな子、みたいになってしまいました。
cocos2dの描画順で、キャラクターのほうが先に描かれたためにこうなってしまいました。
キャラクターを上に持ってくるのは割と簡単です。
addChild の部分に、Z方向の値を指定すれば良いだけです。
修正前
[objc]
// Spriteを追加
[self addChild:sprite1];
[self addChild:background];
[/objc]
修正後
[objc]
// Spriteを追加
[self addChild:sprite1 z:2];
[self addChild:background z:1];
[/objc]
これでビルドしてみましょう。
ちゃんとキャラクターが前に出てきてくれました。
次回はキャラクターを動かしてみます。