リモートリポジトリの置いてあるサーバ上にローカルリポジトリを設置して、作業ツリーをWebに公開する

git リモートリポジトリ ローカルリポジトリ

Gitを使ってみて、Gitのしくみがいまいちわからなくて混乱したので、今日わかったことを羅列します。

今日やりたかったことは、

  1. 自分のパソコンにあるプロジェクトをGitでバージョン管理したい。
  2. Webサーバとして使っているサーバにリポジトリ(リモートリポジトリ)を置きたい。
  3. リモートリポジトリからプルしたものをWebに公開したい。

この3つです。

まずよくわかっていなかったのが、「リモートリポジトリ」というものの存在です。
リモートリポジトリというのは「遠隔にあるリポジトリ」だと思っていて、ローカルリポジトリの一種だと思っていました。

しかしその理解はまちがいでした。
リモートリポジトリとは、みんながコミットする集積所みたいなものなのですね。

git リモートリポジトリ ローカルリポジトリ

リモートリポジトリとローカルリポジトリがこんがらがっていたので、サーバ上のどれをWebに公開すればいいのかと、ずーと悩んでいました。
リモートリポジトリの作業ツリーを公開するのではなくて、サーバマシン内にGit Cloneして、そこの作業ツリーをWebに公開すればよかったのですね。

実際のコードとしては、

まず、クローンを設置する場所(/var/www/test/)に移動して、

[bash]
$ cd /var/www/test/
[/bash]

リモートリポジトリ(/var/git_repos/TEST_WEB.git)からクローンを作成する

[bash]
$ git clone /var/git_repos/TEST_WEB.git
[/bash]

 
こちらのページが非常に参考になりました。
Git初心者に捧ぐ!Gitの「これなんで?」を解説します。

iPhoneアプリ申請で新規アプリ作成をするときにBunlde IDに新しく作成したApp IDが出てこない

Bundle ID not found

iTunes ConnectからのiPhoneアプリ申請で、新規アプリ作成をするときに新しく作成したApp IDが出てこない問題が発生しました。(2013年 11月13日)

Bundle ID not found

先月も同様の問題が発生していたようです。(2013年 10月28日)

https://devforums.apple.com/message/912211#912211

そして前日にも同様の内容でフォーラムに投稿されていました。

https://devforums.apple.com/message/917778#917778

申請が出せないのは困るので(納期的に)、contact usから「問題があって新規にアプリ申請できませんよ!」って送ったのですが、「スクリーンショットとか添付してまた返信してください(じゃないと対応しないよ)」というつれない返事。

それで困り果ててしまったのですが、翌日再度見てみると、なんと追加されていました。意味がわかりません。(前日のスクリーンショットを再確認したのですが、前日は間違いなく追加されていなかったので、見落としではありませんでした。)

つまり、一日置いたらBundle IDがアプリ新規申請ページのドロップダウンメニューに追加されていたのです。他には何もしていません。

というわけで、Bundle IDが出てこない時の解決法としては「1日寝かせてみる」でしょうか。それでダメだったらアップルにメールしましょう。
iTunes ConnectやiOS dev centerはここ数ヶ月ぐらいずっと挙動がおかしい気がします。
安定するように改善して欲しいところです。。。

iOS7 : Star Rating 星をタッチして5段階のレーティングができるUIView

star rating objective-c uiview

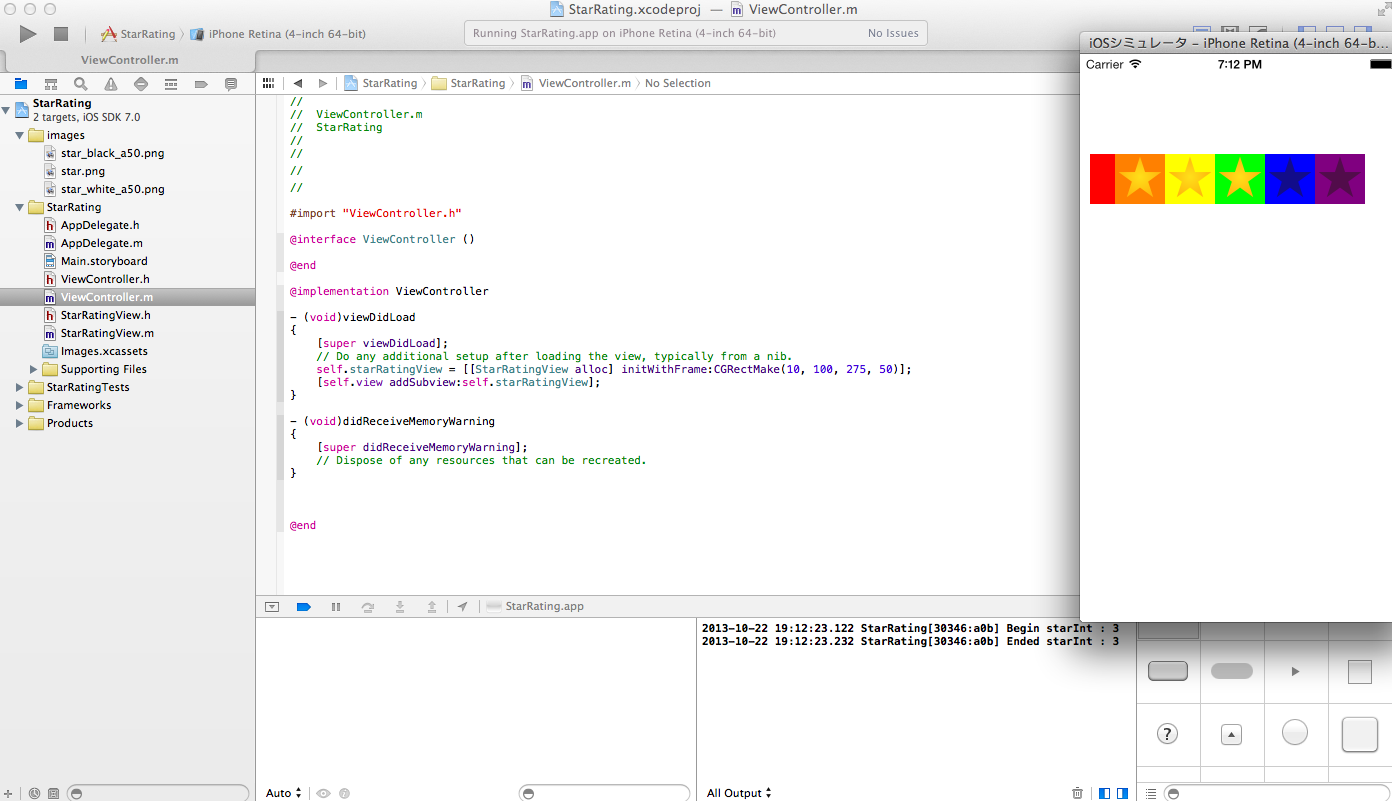
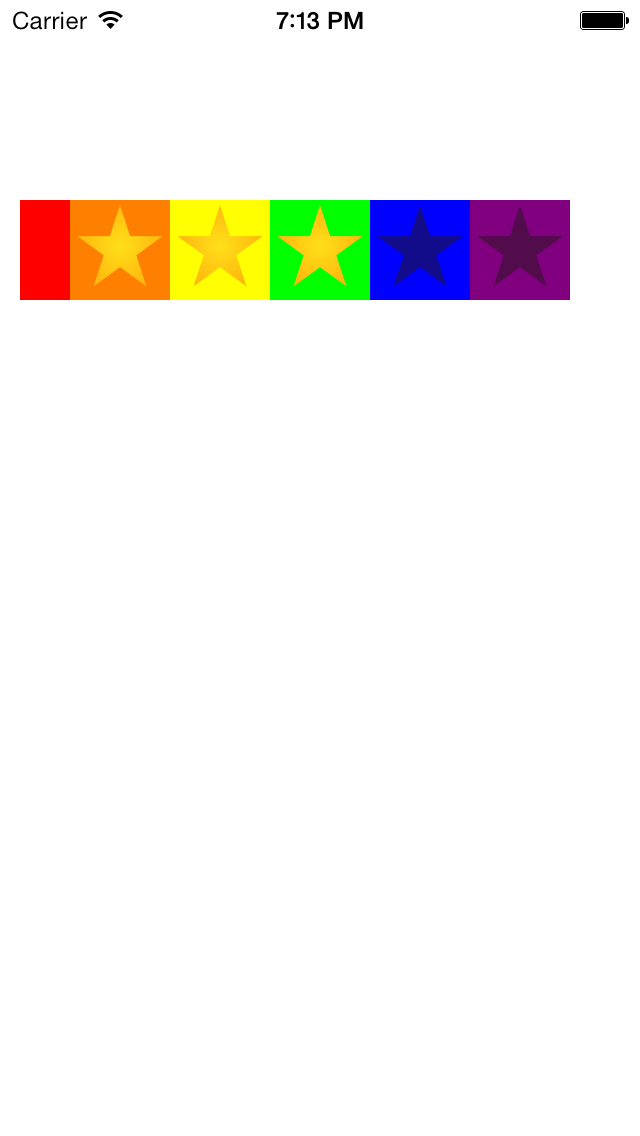
レーティング用のUI素材を作成しました。

star rating objective-c uiview

5つ並んだ星をタッチして、AppStoreのレビューのように0~5の値を入出力できるUI用のパーツです。わかりやすくするよう、星ひとつひとつの背景色に色をつけてあります。また、一番端の赤い領域に触れると、星を0として入力できます。

Githubにサンプルコード置きました。

こちらがUIViewのサブクラスStarRatingViewの本体。

StarRatingView.h

[objc]
#import <UIKit/UIKit.h>

@interface StarRatingView : UIView{
UIView * zeroView;
UIImageView * firstStarView;
UIImageView * secondStarView;
UIImageView * thirdStarView;
UIImageView * fourthStarView;
UIImageView * fifthStarView;
}

@property(nonatomic) int starValue;

@property(strong, nonatomic) UIImage * starImage;
@property(strong, nonatomic) UIImage * darkStarImage;

@end

[/objc]

StarRatingView.m

[objc]
#import "StarRatingView.h"

#define STAR_WIDTH(width) width / 5.5
#define FIRST_STAR_X(width) width / 11
#define SECOND_STAR_X(width) (3 * width) /11
#define THIRD_STAR_X(width) (5 * width) /11
#define FOURTH_STAR_X(width) (7 * width) /11
#define FIFTH_STAR_X(width) (9 * width) /11

@implementation StarRatingView

– (id)initWithFrame:(CGRect)frame
{
self = [super initWithFrame:frame];
if (self) {
// Initialization code

// 初期値
self.starValue = 0;

// タッチができるようにする
self.userInteractionEnabled = YES;

// 星用のimageViewを作成
zeroView = [[UIView alloc] initWithFrame:CGRectMake(0, 0, STAR_WIDTH(self.frame.size.width), self.frame.size.height)];
firstStarView = [[UIImageView alloc] initWithFrame:CGRectMake(FIRST_STAR_X(self.frame.size.width), 0, STAR_WIDTH(self.frame.size.width), self.frame.size.height)];
secondStarView = [[UIImageView alloc] initWithFrame:CGRectMake(SECOND_STAR_X(self.frame.size.width), 0, STAR_WIDTH(self.frame.size.width), self.frame.size.height)];
thirdStarView = [[UIImageView alloc] initWithFrame:CGRectMake(THIRD_STAR_X(self.frame.size.width), 0, STAR_WIDTH(self.frame.size.width), self.frame.size.height)];
fourthStarView = [[UIImageView alloc] initWithFrame:CGRectMake(FOURTH_STAR_X(self.frame.size.width), 0, STAR_WIDTH(self.frame.size.width), self.frame.size.height)];
fifthStarView = [[UIImageView alloc] initWithFrame:CGRectMake(FIFTH_STAR_X(self.frame.size.width), 0, STAR_WIDTH(self.frame.size.width), self.frame.size.height)];

// 星を作成
self.starImage = [UIImage imageNamed:@"star.png"];
self.darkStarImage = [UIImage imageNamed:@"star_black_a50.png"];

// 画像を指定
firstStarView.image = self.darkStarImage;
secondStarView.image = self.darkStarImage;
thirdStarView.image = self.darkStarImage;
fourthStarView.image = self.darkStarImage;
fifthStarView.image = self.darkStarImage;

// viewに追加
[self addSubview:zeroView];
[self addSubview:firstStarView];
[self addSubview:secondStarView];
[self addSubview:thirdStarView];
[self addSubview:fourthStarView];
[self addSubview:fifthStarView];

// 背景色を変更
zeroView.backgroundColor = [UIColor redColor];
firstStarView.backgroundColor = [UIColor orangeColor];
secondStarView.backgroundColor = [UIColor yellowColor];
thirdStarView.backgroundColor = [UIColor greenColor];
fourthStarView.backgroundColor = [UIColor blueColor];
fifthStarView.backgroundColor = [UIColor purpleColor];
self.backgroundColor = [UIColor grayColor];

}
return self;
}

/*
// Only override drawRect: if you perform custom drawing.
// An empty implementation adversely affects performance during animation.
– (void)drawRect:(CGRect)rect
{
// Drawing code
}
*/

// タッチ開始
– (void)touchesBegan:(NSSet *)touches withEvent:(UIEvent *)event
{
UITouch *touch = [touches anyObject];
CGPoint location = [touch locationInView:self];
//NSLog(@"Began x:%f y:%f", location.x, location.y);
int starInt = [self calculateTouchLocation:location.x];
NSLog(@"Begin starInt : %d", starInt);
[self showStar:starInt];
self.starValue = starInt;
}

// タッチ移動
– (void)touchesMoved:(NSSet *)touches withEvent:(UIEvent *)event
{
UITouch *touch = [touches anyObject];
CGPoint location = [touch locationInView:self];
//NSLog(@"Moved x:%f y:%f", location.x, location.y);
int starInt = [self calculateTouchLocation:location.x];
//NSLog(@"Moved starInt : %d", starInt);
[self showStar:starInt];
self.starValue = starInt;
}

// タッチ終了
– (void)touchesEnded:(NSSet *)touches withEvent:(UIEvent *)event
{
UITouch *touch = [touches anyObject];
CGPoint location = [touch locationInView:self];
//NSLog(@"Ended x:%f y:%f", location.x, location.y);
int starInt = [self calculateTouchLocation:location.x];
NSLog(@"Ended starInt : %d", starInt);
[self showStar:starInt];
self.starValue = starInt;
}

// 座標を0~5の数値に変換
-(int)calculateTouchLocation:(double)locationX
{
int starInt = 0;
if (locationX < FIRST_STAR_X(self.frame.size.width)) {
starInt = 0;
}else if (locationX >= FIRST_STAR_X(self.frame.size.width) && locationX < SECOND_STAR_X(self.frame.size.width)){
starInt = 1;
}else if (locationX >= SECOND_STAR_X(self.frame.size.width) && locationX < THIRD_STAR_X(self.frame.size.width)){
starInt = 2;
}else if (locationX >= THIRD_STAR_X(self.frame.size.width) && locationX < FOURTH_STAR_X(self.frame.size.width)){
starInt = 3;
}else if (locationX >= FOURTH_STAR_X(self.frame.size.width) && locationX < FIFTH_STAR_X(self.frame.size.width)){
starInt = 4;
}else if (locationX >= FIFTH_STAR_X(self.frame.size.width)){
starInt = 5;
}else{
starInt = 0;
}
return starInt;
}

-(void)showStar:(int)value{
switch (value) {
case 0:
firstStarView.image = self.darkStarImage;
secondStarView.image = self.darkStarImage;
thirdStarView.image = self.darkStarImage;
fourthStarView.image = self.darkStarImage;
fifthStarView.image = self.darkStarImage;
break;

case 1:
firstStarView.image = self.starImage;
secondStarView.image = self.darkStarImage;
thirdStarView.image = self.darkStarImage;
fourthStarView.image = self.darkStarImage;
fifthStarView.image = self.darkStarImage;
break;

case 2:
firstStarView.image = self.starImage;
secondStarView.image = self.starImage;
thirdStarView.image = self.darkStarImage;
fourthStarView.image = self.darkStarImage;
fifthStarView.image = self.darkStarImage;
break;

case 3:
firstStarView.image = self.starImage;
secondStarView.image = self.starImage;
thirdStarView.image = self.starImage;
fourthStarView.image = self.darkStarImage;
fifthStarView.image = self.darkStarImage;
break;

case 4:
firstStarView.image = self.starImage;
secondStarView.image = self.starImage;
thirdStarView.image = self.starImage;
fourthStarView.image = self.starImage;
fifthStarView.image = self.darkStarImage;
break;

case 5:
firstStarView.image = self.starImage;
secondStarView.image = self.starImage;
thirdStarView.image = self.starImage;
fourthStarView.image = self.starImage;
fifthStarView.image = self.starImage;
break;

default:
firstStarView.image = self.darkStarImage;
secondStarView.image = self.darkStarImage;
thirdStarView.image = self.darkStarImage;
fourthStarView.image = self.darkStarImage;
fifthStarView.image = self.darkStarImage;
break;
}
}

@end

[/objc]

設置方法

実装するときはStarRatingViewオブジェクトをaddSubViewすれば設置できます。
viewControllerなどにこんなかんじで設置します。

[objc]
StarRatingView *starRatingView = [[StarRatingView alloc] initWithFrame:CGRectMake(10, 100, 275, 50)];
[self.view addSubview:self.starRatingView];
[/objc]

値を出し入れするときは、「starRatingView.starValue」からアクセスします。

Githubにサンプルコード置きました。


iOS7 StarRating

cocos2dの新規プロジェクトを縦画面に変更する(バージョン2.1)

cocos2d 横画面にする

cocos2dの新規プロジェクトで作ったアプリの画面は横画面(Landscape)ですが、これを縦画面(Portrait)に変更します。バージョンは2.1です。

まずiPhone / iPod Deployment Infoを変更します。

cocos2d 横画面にする

つぎにAppDelegate.mを変更します。

AppDelegate.m

[objc]
// The available orientations should be defined in the Info.plist file.
// And in iOS 6+ only, you can override it in the Root View controller in the "supportedInterfaceOrientations" method.
// Only valid for iOS 6+. NOT VALID for iOS 4 / 5.
-(NSUInteger)supportedInterfaceOrientations {

// iPhone only
if( [[UIDevice currentDevice] userInterfaceIdiom] == UIUserInterfaceIdiomPhone )
//return UIInterfaceOrientationMaskLandscape;
return UIInterfaceOrientationMaskPortrait; // 差し替え

// iPad only
//return UIInterfaceOrientationMaskLandscape;
return UIInterfaceOrientationMaskPortrait; // 差し替え
}

// Supported orientations. Customize it for your own needs
// Only valid on iOS 4 / 5. NOT VALID for iOS 6.
– (BOOL)shouldAutorotateToInterfaceOrientation:(UIInterfaceOrientation)interfaceOrientation
{
// iPhone only
if( [[UIDevice currentDevice] userInterfaceIdiom] == UIUserInterfaceIdiomPhone )
//return UIInterfaceOrientationIsLandscape(interfaceOrientation);
return UIInterfaceOrientationIsPortrait(interfaceOrientation); // 差し替え

// iPad only
// iPhone only
//return UIInterfaceOrientationIsLandscape(interfaceOrientation);
return UIInterfaceOrientationIsPortrait(interfaceOrientation); // 差し替え
}
[/objc]

以上で横画面化は完了です。

cocos2dでEXC_BAD_ACCESSしかでなくて泣きそうになった。

cocos2dで新しいクラスを作成して、別のクラスからメソッドを実行しようとしたらEXC_BAD_ACCESSがひたすら出て、困り果てました。

結論から言うと、作業していたcocos2dプロジェクトをARC対応にしていなかったのが原因でした。

Cocos2D 2.X プロジェクトをARCに対応させる方法

↑こちらのページの方法でプロジェクトをARC対応させたらうまくいきました。

備忘のため時系列メモ

  • cocos2dのバージョンは2.1
  • CCNodeのサブクラスとして作ったクラスHoge
  • プロパティとしてCCSprite, CCSpriteBatchNodeがある。
  • メソッドとしてrunAnimationという、CCSpriteのアニメーションを動かすメソッドがある
  • このクラスHogeを、別クラスからrunAnimationを実行しようとしたらEXC_BAD_ACCESS
  • ARC対応にしたらあっさり治った。

cocos2dでiPhoneゲーム開発_4 : キャラクターを動かしてみよう

cocos2d パラパラ漫画
  1. まずはインストールから
  2. スプライトを置いてみよう
  3. 背景を置いてみよう
  4. キャラクターを動かしてみよう ←いまここ

パラパラ漫画のようにキャラクターを動かしてみよう

前回まででキャラクターと背景を置くことができました
今回は、前回置いたキャラクターをアニメのように動かしてみます。

cocos2d パラパラ漫画
run-hd.png
cocos2d パラパラマンガ
run.png

アニメーションするコードを書きましょう

下記の「ここから追加(4.キャラクターを動かしてみよう)」から「ここまで追加(4.キャラクターを動かしてみよう)」を前回までのコードに追加します。

[objc]
// on "init" you need to initialize your instance
-(id) init
{
// always call "super" init
// Apple recommends to re-assign "self" with the "super’s" return value
if( (self=[super init]) ) {
// Spriteを生成
CCSprite * sprite1 = [CCSprite spriteWithFile:@"sample1.png"];
CCSprite * background = [CCSprite spriteWithFile:@"background.png"];
// スプライトを画像の中心に配置する
CGSize winSize = [[CCDirector sharedDirector] winSize];
sprite1.position = CGPointMake(winSize.width/2, winSize.height /2);
background.position = CGPointMake(winSize.width/2, winSize.height /2);
// Spriteを追加
[self addChild:sprite1 z:2];
[self addChild:background z:1];

// ここから追加(4.キャラクターを動かしてみよう)
//一枚の画像からパラパラ漫画のようなアニメを作る
//バッチノードの設定
CCSpriteBatchNode * batchRun= [CCSpriteBatchNode batchNodeWithFile:@"run.png"];
[self addChild:batchRun z:3];

//スプライトをつくり バッチノードに入れる
CCSprite *spriteRun= [CCSprite spriteWithFile:@"run.png"];
spriteRun.position = CGPointMake(winSize.width/2, winSize.height /2);;
[batchRun addChild:spriteRun];

//画像データを配列に登録
CCSpriteFrame* frame1 = [CCSpriteFrame frameWithTexture:batchRun.texture rect:CGRectMake(0,0,128,128)];
CCSpriteFrame* frame2 = [CCSpriteFrame frameWithTexture:batchRun.texture rect:CGRectMake(128,0,128,128)];
CCSpriteFrame* frame3 = [CCSpriteFrame frameWithTexture:batchRun.texture rect:CGRectMake(256,0,128,128)];
CCSpriteFrame* frame4 = [CCSpriteFrame frameWithTexture:batchRun.texture rect:CGRectMake(384,0,128,128)];
CCSpriteFrame* frame5 = [CCSpriteFrame frameWithTexture:batchRun.texture rect:CGRectMake(0,128,128,128)];
CCSpriteFrame* frame6 = [CCSpriteFrame frameWithTexture:batchRun.texture rect:CGRectMake(128,128,128,128)];
CCSpriteFrame* frame7 = [CCSpriteFrame frameWithTexture:batchRun.texture rect:CGRectMake(256,128,128,128)];
CCSpriteFrame* frame8 = [CCSpriteFrame frameWithTexture:batchRun.texture rect:CGRectMake(384,128,128,128)];

NSArray* frameArray = [NSArray arrayWithObjects: frame1, frame2,frame3,frame4,frame5,frame6,frame7,frame8, nil];

//アニメをつくる
CCAnimation *animation = [CCAnimation animationWithFrames:frameArray delay:0.1f];
id repeat = [CCRepeatForever actionWithAction:[CCAnimate actionWithAnimation:animation restoreOriginalFrame:NO]];
[spriteRun runAction:repeat];
// ここまで追加(4.キャラクターを動かしてみよう)
}
return self;
}
[/objc]

ちょっと長くなってしまいました。
イメージでお話するとこんなかんじです。

  1. spriteRunという一枚の紙にrun.pngを印刷
  2. その紙をframe1~8までのカードに切断
  3. これをframeArrayというホチキスで束にして
  4. animationrepeatでできたカードめくり装置にセットする
  5. 最後にbatchRunという指定の置き場(スプライト)に置いて完成

それではビルドしてみましょう。

iphone パラパラ漫画

女の子が走っているのが確認できたと思います。

次回は、この走りに合わせて背景も動かしてみます。

cocos2dでiPhoneゲーム開発_3 : 背景を置いてみよう

background
  1. まずはインストールから
  2. スプライトを置いてみよう
  3. 背景を置いてみよう ←いまここ

キャラクターの後ろに背景画像を配置する

前回と同じ要領で、背景を置いてみましょう。
背景画像はこちら。

background-hd.png
background-hd.png
background
background.png

そういえば前回書き忘れましたが、画像素材をなぜサイズ違いで2種類用意するのか。
これは、iPhoneのRetinaモデルとそうでないものを両方共対応するためです。
-hdとつけると、Retina用の画像だと識別してくれます。便利ですね。

それでは本題。前回作ったコードをいじっていきます。

前回同様にコードを追加してみましょう

-(id)init を以下のように修正します。

[objc]
-(id) init
{
// Spriteを生成
CCSprite * sprite1 = [CCSprite spriteWithFile:@"sample1.png"];
CCSprite * background = [CCSprite spriteWithFile:@"background.png"]; // 背景用に追加したコード
// スプライトを画像の中心に配置する
CGSize winSize = [[CCDirector sharedDirector] winSize];
sprite1.position = CGPointMake(winSize.width/2, winSize.height /2);
background.position = CGPointMake(winSize.width/2, winSize.height /2); // 背景用に追加したコード
// Spriteを追加
[self addChild:sprite1];
[self addChild:background]; // 背景用に追加したコード
}
return self;
}
[/objc]

sprite1と同じようにbackgroundという新しいスプライトを同じ位置に置いただけです。
とりあえずこのままビルドしてみましょう。

cocos2d 背景

壁に隠れたシャイな子、みたいになってしまいました。
cocos2dの描画順で、キャラクターのほうが先に描かれたためにこうなってしまいました。

キャラクターを上に持ってくるのは割と簡単です。
addChild の部分に、Z方向の値を指定すれば良いだけです。

修正前

[objc]
// Spriteを追加
[self addChild:sprite1];
[self addChild:background];
[/objc]

修正後

[objc]
// Spriteを追加
[self addChild:sprite1 z:2];
[self addChild:background z:1];
[/objc]

これでビルドしてみましょう。

cocos2d 背景

ちゃんとキャラクターが前に出てきてくれました。

次回はキャラクターを動かしてみます。

cocos2dでiPhoneゲーム開発_2 : スプライトを置いてみよう

プロジェクト「Sprite1」の作成

今回は、スプライトを設置してみます。スプライトとはUIKitで言うところの、UIViewのようなものです。最終的には以下の様な画面が出るようにします。

スクリーンショット 2013-07-29 0.10.34
前回でプロジェクトが作れるようになったので、まずはプロジェクトを作ってみましょう。
今回はプロジェクト名は「Sprite1」という名前にしました。
「cocos2d iOS」を選択します。
スクリーンショット 2013-07-28 22.48.35

「Sprite1」という名前をつけてNext。
cocos2d プロジェクト作成

以上でSprite1のプロジェクトが出来上がりました。
それでは早速ビルドしてみましょう。

cocos2d ビルド

このボタンを押すとシュミレーターが起動します。
cocos2dの画面が出た後、「Hello World」と出て来ます。

cocos2d hello world

スプライトを置いてみる

それでは、この「Hello World」と書いてある部分に、画像を表示させてみましょう。
「HelloWorldLayer.m」を選択します。

HelloWorldLayer.m

続いて、ファイルの中の以下の記述の部分について

[objc]

// on "init" you need to initialize your instance
-(id) init
{
// always call "super" init
// Apple recommends to re-assign "self" with the "super’s" return value
if( (self=[super init]) ) {

// create and initialize a Label
CCLabelTTF *label = [CCLabelTTF labelWithString:@"Hello World" fontName:@"Marker Felt" fontSize:64];

// ask director for the window size
CGSize size = [[CCDirector sharedDirector] winSize];

// position the label on the center of the screen
label.position = ccp( size.width /2 , size.height/2 );

// add the label as a child to this Layer
[self addChild: label];

//
// Leaderboards and Achievements
//

// Default font size will be 28 points.
[CCMenuItemFont setFontSize:28];

// to avoid a retain-cycle with the menuitem and blocks
__block id copy_self = self;

// Achievement Menu Item using blocks
CCMenuItem *itemAchievement = [CCMenuItemFont itemWithString:@"Achievements" block:^(id sender) {

GKAchievementViewController *achivementViewController = [[GKAchievementViewController alloc] init];
achivementViewController.achievementDelegate = copy_self;

AppController *app = (AppController*) [[UIApplication sharedApplication] delegate];

[[app navController] presentModalViewController:achivementViewController animated:YES];

[achivementViewController release];
}];

// Leaderboard Menu Item using blocks
CCMenuItem *itemLeaderboard = [CCMenuItemFont itemWithString:@"Leaderboard" block:^(id sender) {

GKLeaderboardViewController *leaderboardViewController = [[GKLeaderboardViewController alloc] init];
leaderboardViewController.leaderboardDelegate = copy_self;

AppController *app = (AppController*) [[UIApplication sharedApplication] delegate];

[[app navController] presentModalViewController:leaderboardViewController animated:YES];

[leaderboardViewController release];
}];

CCMenu *menu = [CCMenu menuWithItems:itemAchievement, itemLeaderboard, nil];

[menu alignItemsHorizontallyWithPadding:20];
[menu setPosition:ccp( size.width/2, size.height/2 – 50)];

// Add the menu to the layer
[self addChild:menu];

}
return self;
}

[/objc]

次のように修正します。

[objc]
// on "init" you need to initialize your instance
-(id) init
{
// always call "super" init
// Apple recommends to re-assign "self" with the "super’s" return value
if( (self=[super init]) ) {
// Spriteを生成
CCSprite * sprite1 = [CCSprite spriteWithFile:@"sample1.png"];
// Spriteを追加
[self addChild:sprite1];
}
return self;
}
[/objc]

if( (self=[super init]) ){ [中略] }
[中略]の部分をおもいっきり削除して、コードを入れています。

続いて、画像を追加します。
こちらの画像、sample1.pngとsample1-hd.pngを

sample1.png
sample1.png
sample1-hd
sample1-hd.png

Resourcesに追加します。

スクリーンショット 2013-07-29 0.02.37

それではビルドしてみましょう!

スクリーンショット 2013-07-29 0.00.26

見切れていますが、画像が追加できました!

位置を調整しよう

画像が見切れているのは、配置する座標を指定していないからです。
座標を指定するコードは以下のとおり。

[objc]

// スプライトを画像の中心に配置する
CGSize windowSize = [[CCDirector sharedDirector] windowSize];
sprite1.position = CGPointMake(windowSize.width/2, windowSize.height /2);

[/objc]

これをさきほどのコードの中に挿入します。

[objc]
// on "init" you need to initialize your instance
-(id) init
{
// always call "super" init
// Apple recommends to re-assign "self" with the "super’s" return value
if( (self=[super init]) ) {
// Spriteを生成
CCSprite * sprite1 = [CCSprite spriteWithFile:@"sample1.png"];
// スプライトを画像の中心に配置する
CGSize winSize = [[CCDirector sharedDirector] winSize];
sprite1.position = CGPointMake(winSize.width/2, winSize.height /2);
// Spriteを追加
[self addChild:sprite1];
}
return self;
}
[/objc]

これで画像が画面中央に表示できました。

スクリーンショット 2013-07-29 0.10.34

cocos2dでiPhoneゲーム開発_1 : まずはインストールから

cocos2d 2.1 インストール

cocos2dというスマートフォン向けの2Dゲーム開発用フレームワークを利用して、iPhone向けのゲームを開発して行きたいと思います。

cocos2dを選ぶメリットはいくつかありますが、まず第一には、「簡単にゲームが作れるから」。
通常2DゲームをiPhoneアプリ向けに作るとなると、OpenGLESというものを使います。これはかなり高度な描画ができるものなのですが、反面、難解で複雑です。
OpenGLESのパワーをそのままに、ゲーム向けに作りやすく整理してくれたものがcocos2dです。こういったものが無料で使えるなんて、ありがたいですね。

それでは、まずはインストールから行います。
http://www.cocos2d-iphone.org

cocos2dのサイトから、最新の安定版をダウンロードします。
2013/7/17現在、最新版は2.1でした。

cocos2d 2.1 インストール

ダウンロードしたら、デスクトップに展開。

cocos2d 展開

テンプレートをインストールするために、ターミナルを開きます。

ターミナルを開いたら、cocos2dが置いてあるフォルダに移動します。

$ cd ~Desktop/cocos2d-iphone/

続いて、インストールは以下を入力すればOK

$ ./install-templates.sh

「done!」と出たらOK。
無事インストールされたか、Xcodeを開いて確認してみましょう。

cocos2d インストール

新規プロジェクトを作る画面で、cocos2dが追加されています。
それでは次回からは、実際にプロジェクトを作成してみます。